Lab First Week
Organizing the First Two Weeks of Chem 105 or 102 Lab
Revised January 23, 2001
On Day 1
Your instructor will go over lab rules and safety procedures. Return one signed copy of the safety rules to your instructor.
Check into your locker and list all materials that are missing, broken, or irretrievably dirty. Get these from the glassware storeroom. Place your name and locker number on the Master Sheet. Check weighing bottles and crucibles for paper labels that have been glued onto them. If these labels cannot be removed, the item must be replaced. Anything destined for a drying oven cannot have a paper label on it. Acetone can be used to remove accumulated marker pen graffiti (on day 2). Since most of you have no safety glasses on the first day, you can't do any "wet" cleaning up until day 2. Make sure that you have a proper stopper for all your volumetric flasks and glass stoppered flasks and bottles. Unused stoppers that may have accumulated in your drawer should be returned to the storeroom. Check your sintered glass crucibles for the M or F of Medium or Fine porosity. It you have a C, for Coarse porosity, replace it with an M. Do not accept dirty crucibles from the storeroom. If all they have are F crucibles, then check them for reasonable filtration rates (on day 2) and return them if they are too slow.
Class Balance Calibration Exercise Your instructor will give the class a brief introduction to the electronic balance. Following this, take a weighing bottle and record its mass on all ten balances. (Alternatively, your instructor may have you use a calibrated metal mass for this exercise.) Record these masses on the Balance Calibration Check sheet posted on the wall. Look for any odd behavior by any of the balances. If you weigh a glass weighing bottle, check for the presence of "static cling" (charges on the glass) which can cause very unreliable behavior. To check for static cling, hold the glassware near the balance pan but not touching it. If the mass starts to fluctuate, you have the problem. Glassware that has recently been oven-dried is most apt to have static cling.
Basic directions for using a balance for the first time are as follows: Inspect the balance for chemicals spilled into the balance pan area, and consult with your instructor for proper cleanup. Push the ON button, letting the balance do its internal self-check. Then press Calibrate. Once calibration is complete, place an object such as a weighing bottle, on the pan. When the balance has reached a stable mass, the letter "g" will appear next to the mass (Sartorius A200S). (If the mass won't stabilize, the problem might not be your balance, but rather the "static cling" condition noted above. Ask your instructor for help.) Note its mass with all balance doors closed. Open one of the doors and make a slight breeze with your hand. Note how the mass fluctuates. "Internal breezes" can also be created by attempting to weigh hot objects. Remove the object from the pan and make sure that the balance returns to zero. Remember to press the "T" for Tare button to zero the balance before each subsequent mass measurement. Test for "static cling" if you think it might be present. The Calibrate operation need be done only once per lab period unless you have reason to believe that more frequent calibration is required.
Before leaving the balance room, clean up any mess in or around the balance and CLOSE the balance doors. (If you follow proper procedures there will never be any messes in or around your balance, but we live in an imperfect world.)
Sign up for one of the electronic analytical balances on the posted Balance Sign-Up Form. Do not sign up for a balance with two of your classmates already assigned. There must be no more than two per balance.
Preparing for Day 2
 You must have safety glasses and a bound laboratory notebook. Remember to wear
closed-toed shoes to lab as well. You may wish to invest in a pair of white
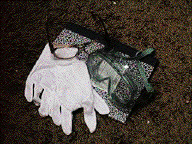
cotton gloves for handing glassware that is to be weighed. These are available
at photographic stores or cosmetics counters. You don't have to wear white
ones, of course, so any clean cotton gloves would do.
You must have safety glasses and a bound laboratory notebook. Remember to wear
closed-toed shoes to lab as well. You may wish to invest in a pair of white
cotton gloves for handing glassware that is to be weighed. These are available
at photographic stores or cosmetics counters. You don't have to wear white
ones, of course, so any clean cotton gloves would do.
Read the Lab Notes handout up through the notes on the gravimetric and volumetric chloride analyses. Also read the description of the Experiment on the single-sheet Laboratory Experiment schedule. The assigned reading chapter in your book on basic lab materials and procedures will provide useful background information.
The really scary first assignment in the lab is preparing an outline of what your procedure will be for the first analysis. How the heck are you supposed to do that when you just got here? The Lab Notes tell how to organize your notebook, but have no details on putting down that first procedure. Your instructor said something about the procedure in your book, but you were given so many handouts, you have no clue where anything is. HELP!
Here's what to do.
1. Put your name and lab section on the front of your lab book. At last, a start!
2. On the inside cover put your locker number and combination.
3. Number all the pages in your notebook. Since we will be using only the right-hand page for serious procedures, data, observations, and results, you need only number the right-hand page.
4. Leave the first two pages blank for a Table of Contents.
5. On page Three put the title: Masses of Weighing Bottles.
6. On page Four put the title: Gravimetric Analysis of Chloride.
7. Now consult the Lab Notes handout for the Lab Notebook section. (1) says to use a Title. You have done that. (2) says to provide a brief theoretical discussion and chemical reactions. You dimly remember your instructor telling you that the first experiment is very simple. The chloride in an unknown is precipitated with an excess of silver ion to form silver chloride. The resulting precipitate must be digested, washed, filtered, dried and weighed. The reaction is Ag+ + Cl- --> AgCl(s). You know there are more details on how this all happens, but will this be enough to pass the notebook check? (It will.) Hey, if more important details show up later that you want to remember, you can always write them on that now-blank left-hand page. (3) says to make an outline of the experimental procedure that you will actually carry out. PANIC! Where is this procedure in all the mass of paper you've been given? Look in your textbook. The lab schedule even tells you which pages to use, and what changes to make to the procedure found there. Other changes may have been announced in class. Hopefully, you have written them down. If not, you can always ask your instructor if your written procedure is OK. He doesn't seem like such a scary person.
Convert the narrative in your textbook into a step-by-step procedure. Make any changes or modifications you have been told about.
On Day 2
1. Now that you have your safety glasses, clean up your glassware. If your desiccator needs new desiccant because the indicator granules are pink (wet), not blue (dry), place the old in the designated waste container and replace with new.
2. Dry the weighing bottles with a cloth towel or Kimwipe. Give each an identifying label by writing with a graphite pencil on the frosted areas. Weigh each of these (with the lid) and record the masses in a data table in your laboratory notebook.
3. Your instructor will issue your unknown bag (if you remembered to put the procedure in your lab book) and your sliver nitrate bag. Be sure to record your unknown number in your laboratory notebook. Label each data entry, leaving space for it to stand out clearly. Don't just jam things together in random corners of your pages.
4. Transfer your unknown chloride to a weighing bottle. Label the bottle with "Cl unk" and your name. Weigh the bottle and record how much unknown you have been given. You should have 3 g or so of unknown.
5. Transfer your silver nitrate to a weighing bottle, label and weigh it. Record the mass of silver nitrate. You should have at least 8.5 grams for Chem 105 or 17 grams for Chem 102. (See step 8 below for making up the silver nitrate solution.)
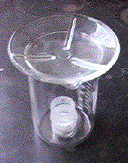 6. Place your chloride unknown weighing bottle in a beaker with the lid off.
The lid can be stored underneath the weighing bottle as shown. Be sure you
have your name on the weighing bottle. Put your name on the beaker in large
letters so someone else won't pick it up by mistake. Put a ribbed watch glass
on top and place it in the 110deg.C Sample drying oven.
6. Place your chloride unknown weighing bottle in a beaker with the lid off.
The lid can be stored underneath the weighing bottle as shown. Be sure you
have your name on the weighing bottle. Put your name on the beaker in large
letters so someone else won't pick it up by mistake. Put a ribbed watch glass
on top and place it in the 110deg.C Sample drying oven.
It should remain in there for at least one hour. After drying, store the weighing bottle in your desiccator.
7. Check that your sintered glass crucibles are either Medium or Fine porosity. Using a brush and distilled water, get rid of as much silver chloride as possible. If your crucibles are stained a dark brown, replace them at the storeroom -- our cleaning procedures will not work with these.
Set up a filtering apparatus under your benchtop snorkel, using a filter flask and rubber crucible holder. Put some distilled water in the filter flask, and make sure it won't fall over. Clamp it in place if necessary.
Place each crucible upright in its own beaker. Use a large enough beaker so you can reach in with your fingers and get them out. With these beakers in a hood, or under one of the benchtop snorkels, pour some 6M Ammonia solution into each crucible. Note that the concentration in the hood reagent bottles is 14.5 M, so you will have to dilute this first. Wait five minutes. If it looks like the silver chloride discoloration is going away, wait a bit more until it looks like the reaction is complete.
Pour distilled water into the beaker, taking care that the water does not go into the sintered glass crucibles and that the water level ends up just below the tops of the crucibles. (This is practice for those times in the future when you must observe the "don't add water to acid" rule.) Tip the crucibles over into the water and rinse them out. Now move the crucible to the filter assembly. Aspirate out the remaining ammonia and rinse with several small portions of distilled water.

If there is time during this lab period, try and get an initial drying of these crucibles in the Swamp oven. Place them in one or more labeled beakers with ribbed watch glasses. Next period we will begin drying these to constant weight.
8. If your crucibles are in the oven and you still have time remaining, you could prepare your 0.1 M silver nitrate solution today. Use at least 8.5 grams (Chem 105) or 17 grams (Chem 102), weighing the silver nitrate accurately by difference into a small beaker. (Remember the beaker stays outside of the balance, while the closed weighting bottle is the only thing inside the balance.) Using a funnel and a wash bottle, wash the silver nitrate into a 500 mL volumetric flask(Chem 105) or 1000 mL Vol Flask (Chem 102). After dissolving the solid, add enough distilled water to accurately bring the level to the mark of the flask. Shake thoroughly for 10 minutes, then transfer into a clean brown 1 liter plastic bottle. Label the plastic bottle with a paper label (one of the few times a paper label is used in this class). Calculate the exact concentration of your silver nitrate, assuming that the silver nitrate is 100% pure. (It isn't, but is close enough for now--we will do a standardization in the Volumetric experiment where we really need a better value.)
9. Before leaving class on day 2, make sure you have left nothing in the ovens. Store dried unknown and dried crucibles in the desiccator.
On Day 3
1. Not everyone will be at the same point on this day. Don't panic, there is still plenty of time to get everything done if you didn't do everything mentioned under Day 2 above. Anything that needs to go into an oven should be put in now, so you will have maximum drying time.
2. Put your dried crucibles into the sample oven. Dry for about one hour, then cool for 20 minutes in your desiccator, then weigh each of them. Record the masses in a data table in your lab notebook. You should also record the exact time and temperature used for this set of weighings. Make the tables big enough for any future entries. Return them to the dry oven for another cycle. Keep doing this until the crucible masses are constant to +/-0.0003 grams. This may take three or four tries. If your mass keeps fluctuating, be sure to check for "static cling."
3. While the crucibles are drying you could either start glassware calibration, or begin the precipitation of your unknown. Your instructor will probably spend about 45 minutes telling you how to use volumetric glassware and how to do the calibrations. We have some flexibility here. If you are still drying your unknown, for example, complete that today, then do the precipitation next period. In the meantime you can do glassware calibration. It all works out by the end of the five periods allotted for gravimetric chloride and glassware calibration.
Remember to have clear data tables for crucible weights and for any unknowns you weigh out for the precipitation. Make the tables big enough for any future entries, and label them clearly. Set each of them off so they can be quickly found, not buried in other material.
The appropriate sample size for each portion of your unknown is about 0.2 g. In lecture you will be shown why this value is chosen, based on our unknowns, which are at most about 60% chloride. [Hint: we have to limit our sample size to stretch our silver nitrate solution to cover three gravimetric runs, and at least four standardizations and four unknown volumetric runs. (Chem 102 has additional experiments using silver nitrate.) We may want even more volumetric runs than this if we can do so. Sample sizes of 0.1 g or less are hard to measure accurately.]
If you do start dissolving your unknowns, remember to use three stirring rods with rubber policemen, one for each sample beaker. Keep the stirring rods in their respective beakers with the rubber part UP, and cover the beakers with parafilm before putting them in your locker until next time. The parafilm will wrap around the stirring rods as you cover the beakers.
4. Start a new page for glassware calibration, so the data don't get confused with your gravimetric experiment. Put a new title at the top of this page. If you can plan ahead, these pages could follow your gravimetric experiment. It is probably easier just to have gravimetric chloride skip around the calibration pages, however. Plan how many pages you think you will need to calibrate two pipets and one buret. Plan the data tables you will need to do this. [When you resume grav chloride, put a new title at the top of that page "Gravimetric Chloride (continued from page xxx)." Don't mix the data from these two experiments together!
Days 4 and 5.
We somehow manage to muddle through the remaining days and get everything done. A few people may still be drying crucibles with silver chloride in them while beginning Volumetric Chloride. That's OK, since results are not reported until both Volumetric and Gravimetric have been completed. Just be sure you start Volumetric Chloride on time.