HPLC Determination of Pain Relievers
(Based on an experiment by Marian Hyman of Texas A&M University)
April 1997
Version 1.02 (minor additions and corrections), May 2000
The Method
We will use High Performance Liquid Chromatography (HPLC) to separate acetylsalicylic acid, caffeine, and acetaminophen in commercially available pain relievers. You must choose a product that has at least two of the above ingredients in it. The package should give you the manufacturer's composition. At the conclusion of the analysis you can compare your results with those stated on the package. Don't assume that the package is correct. The purpose of the written report is to establish the credibility of your analysis.
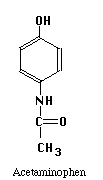
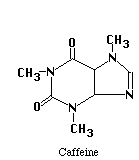
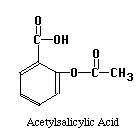
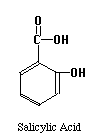
The structures of the compounds we are separating are given below. One more compound has been added, Salicylic Acid. This substance will be our Internal Standard, and will be added in constant amount to all our standard and unknown runs.
Our chromatographic column will be a 30 cm C-18 column, relatively non-polar in character. Our mobile phase will be a mixture of water, methanol and acetic acid. By varying the water-methanol mix we can control the polarity of our solvent. By varying the acetic acid, we can vary its pH. Under acid conditions we might expect that one of the nitrogens in acetaminophen or caffeine (both look like they might be weak bases) to pick up a proton and become a highly polar cation, while acetylsalicylic acid and salicylic acid (both weak acids) remain as less polar molecular species. Another possibility is that acetaminophen does not pick up any protons, but is very polar in its own right. It may be a strong enough weak acid to exist as the anion if the hydroxyl group loses a proton at the pH of the mobile phase. Since "like attracts like" we might expect the acetylsalicylic acid and salicylic acid to interact with the column and be held back, while the acetaminophen or caffeine come through more rapidly. Real life is never quite this simple, so we have to play with our solvent composition, run the chromatograms, and see what we get. What we hope to see is something like the simulated chromatogram below.
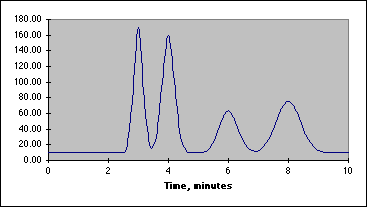
The peak at 3 minutes might be acetaminophen or caffeine and that at 8 minutes could be one of the two acids, but don't count on it. You have to devise a way to identify your peaks once you have achieved baseline separation. This is where standards come in. We will be preparing standard solutions of acetaminophen, acetylsalicylic acid, caffeine and salicylic acid. These will be combined to create a series of calibration solutions that will allow us to determine which peak is which, and what the relationship is between the peak area and the concentration of the standard.
The Instrument
Part of the standard lab report is identification and description of the actual equipment you have used, so make sure you get the manufacturer and model number of all equipment, as well as the source (state the manufacturer, not "the stuff in the lab") and characteristics (reagent grade, HPLC grade, primary standard grade, etc.) of chemicals and other materials. Your experimental setup may differ from that described here, so don't just copy it for your report. (Another good reason not to copy is to avoid getting charged with plagiarism!)

Not all of the components of an HPLC system are shown here, just the ones you have to control.
Before solvent can be pumped through the system, it must be "sparged" with helium to remove dissolved air. Sudden pressure changes inside the pump or as the solvent exits the column can cause bubbles to appear. Inside the pump these bubbles can actually damage the mechanism, and at the very least will cause the pump to stop moving the liquid. Inside the cell of the spectrophotometric detector, bubbles will cause fluctuations in the light intensity passing through it, giving very noisy output signals. Use a very low flow rate of helium to sparge the sample for 5 minutes or so, then shut the helium off before starting the pump. (If the solvent contains toxic chemicals, do the sparging under a hood.) The little rectangles shown in the solvent bottle are special stainless steel "airstones" that serve as either filters for the solvent, or bubblers for the helium.
To prime the pump we attach a 50 mL syringe (plunger all the way in) to the outlet of the Prime/Purge valve. Open the valve a few turns, then turn on the pump and press the RUN button. If you don't see fluid coming out of the Prime/Purge drain, press PRIME momentarily on the pump to get a faster pumping rate. Return to RUN when the fluid flow is established. You may need to pull on the syringe to help the solvent through the pump at first. When you see no more bubbles coming into the syringe, the pump is primed. Close the prime valve. The pump should now be forcing solvent through the rest of the system. Watch for it exiting the detector. Make sure a waste beaker is in place to receive it. Remove the prime syringe and empty it into the waste container.
Set the pump to 1.0 mL per minute. If all is well, the pump pressure should stabilize well under 2000 psi. If someone has injected unfiltered crud onto the column the pressure will rise to its maximum cutoff value, then beep at you if the alarms have been set. Turn off the pump. If you are lucky all that needs to happen next is for you to do a bit of plumbing and replace the filter or pre-column. If you are unlucky you can start looking for $300 to buy a new column. Turn on the variable wavelength detector and set it to 250 nm. Because the output of the detector is being sent to an electronic integrator, rather than to its built-in chart recorder, most of the remaining detector controls will have no effect on the output.
Turn on the Integrator. Several companies make this integrator, the insides are the same, only the outside bears a Spectra-Physics or Varian logo. The instructions which follow work the same on any of these. When you first turn it on it will ask you for the date and time. Either input the information, or just hit ENTER to leave these blank.
To make a Run, first be sure the sample you are to run has been FILTERED. The procedure below includes a filtration step using Whatman #42 filter paper. Other procedures may call for forcing the sample through a millipore filter before injection. However you do it, make sure there is no floating crud in your sample when you inject it onto the column. Unless otherwise directed, force all samples through a millipore filter before loading them into an injection syringe.
A special syringe with a blunt-tipped needle is used to load the sample onto the injection loop.
- Fill the syringe with filtered sample
- Turn the injector loop control to LOAD
- Push the needle all the way into the injector port until it seals against the special fitting. Hold it firmly to minimize leaks.
- Inject the sample until you see it coming out of the waste end of the sample loop.
- Turn the sample loop to INJECT then immediately press INJECT A on the Integrator to start its data run.
- After all the peaks have shown up on the integrator output, press INJECT A again to stop the run. If a Report doesn't print out automatically, press REPORT to get a listing of all the peaks along with their areas and retention times.
The Mobile Phase Solvent
We will prepare this solvent for you. You must use FRESH solvents and mobile phases. If you find old solvents left over from last semester, have new ones made up. Check any supposedly pure solvent containers for contamination. (We found a layer of crud at the bottom of our methanol one semester that clogged everything.) Use 40% (v/v) methanol and 60%(v/v) water to which 1.5%(v/v)glacial acetic acid has been added. With a 10 micron, 30 cm C-18 column we get good separation with this. All materials should be of chromatographic grade. You can try cheaper stuff, but don't blame us if you get a drifting baseline because of impurities in the solvent. The original version of this experiment used a gradient pump and solvent programming to vary the composition during the run. We are running "isocratic" with one unvarying mobile phase.
Preparing the Samples and Standards
The suggested concentrations given below may not give the best set of peaks. If you find that some of your peaks are so large that the instrument is over-ranged, while other peaks are too small to be measured reliably, be prepared to change the suggested concentrations. Look at the concentrations of the ingredients in your chosen tablet. Your procedure must end up with standards that bracket the amounts found in the tablet. Don't just blindly follow the directions below. Choose amounts that will work for your analysis.
Another consideration is your waste stream. Try to minimize the amounts of reagents such as methanol that need to be sequestered after use. The original version of this experiment called for 100 mL of methanol to dissolve many of the samples. We have reduced this to 30 mL in most cases.
Internal Standard (Salicylic Acid in methanol): Rinse a 100 mL volumetric flask with HPLC-grade methanol. Weigh out 1500 mg of salicylic acid, use methanol to quantitatively transfer it to the flask, dissolve it, and make up to the mark.
Unknown Samples (tablets dissolved in methanol plus internal standard): Our pain reliever tablets consist of the active ingredients plus a binder that won't dissolve and must be filtered out. Check the label for the amounts of the ingredients. You may not want to dissolve an entire tablet; the amounts of ingredients must fit within the standards you wish to prepare.
- Weigh a weighing bottle (WB), add one tablet, weigh again. Crush the tablet with a mortar and pestle. Transfer as much as you can back into the WB. Weigh it again.
- Rinse a 125 mL Erlenmeyer flask with methanol. Transfer as much of the tablet as you feel is appropriate from the WB into the flask. Weigh the WB again. Now use a graduated cylinder to add 30 mL of methanol to the flask. Swirl the flask to dissolve all the soluble components of the tablet.
- Use a class-A pipet to add 10.0 mL of the Internal Standard to this flask. Swirl to mix uniformly. Use parafilm to seal the flask and prevent evaporation.
Calibration Standards (varying amounts of aspirin and caffeine plus internal standard in methanol) If your unknown has acetaminophen in it, make sure you don't overload your column. For example, although Exedrin may contain 250 mg of acetaminophen, we will get a split peak caused by column overloading at this level. Use 25 mg of acetaminophen instead. Suggested values for aspirin and caffeine will probably work as specified.
Use four 125 mL Erlenmeyer flasks, rinse them first with methanol.
Dissolve the solids in the 30 mL of methanol before adding the internal standard. The amounts given for Aspirin and Caffeine are for example only. You should choose amounts that fit the tablet you are analyzing. For example, a bottle of "Extra Strength" Exedrin states that each tablet has 250 mg of Acetaminophen, 250 mg of Aspirin, and 65 mg of Caffeine. Assume we chose to dissolve half a tablet. Reasonable choices for our standards would then be:
|
Flask # |
Aspirin |
Caffeine |
Methanol |
Internal Standard |
|
1 |
100 mg |
40 mg |
30 mL |
10.0 mL |
|
2 |
125 mg |
30 mg |
30 mL |
10.0 mL |
|
3 |
150 mg |
20 mg |
30 mL |
10.0 mL |
|
4 |
175 mg |
10 mg |
30 mL |
10.0 mL |
|
Unknown |
1/2 Tablet |
1/2 Tablet |
30 mL |
10.0 mL |
To avoid weighing out individual portions of solids as small as 10 mg, prepare standard solutions of Aspirin and Caffeine in methanol, add the appropriate volumes, then enough methanol to reach about 30 mL. (You can use a larger volume than 30 mL if you need to, just keep the final volume about the same for all solutions so that we will get similar detector responses.) If you have problems getting the Caffeine to dissolve, try using some of the acidfied water/methanol mobile phase as a solvent. The water and lower pH should turn Caffeine into a cation that will readily dissolve. Then add the 10.0 mL of Internal Standard. The composition of the aspirin and caffeine solutions is left as an exercise for the student.
Remember too that the detector measures the absorbance at 250 nm. These substances will not all have the same molar absorptivity at this wavelength, resulting in different peak sizes for similar amounts. You may have to adjust the concentrations if your detector cannot accurately measure the full range of peak sizes for the concentrations you have chosen. (See the warning about acetaminophen given above.) A general rule is that structures showing extensive networks of conjugated double bonds should have higher molar absorptivities than those that do not.
Analysis of the Data
After running the Unknown and the Calibration Standards and getting retention times and peak areas for all the peaks, prepare working curves by plotting Peak Area/Internal Standard Peak Area vs. mg of Standard from your calibration runs, then use Peak Area/Internal Standard Peak Area from the peaks of your unknown run to read the amounts from the calibration curves. Use the usual statistical methods on your working curves. You should be able to deduce which peak is which from the way the peak areas change when you run the standards. Make the appropriate calculations to compute the mg of each ingredient in the original tablets.