|
Trust No One
Leave Nothing to Chance
Students in quantitative analysis laboratory often compromise their results because they fail to take complete control of their experiments. Instead of understanding all parts of the experiment, and placing a set of well thought out steps into their laboratory notebooks, they rely on others to tell them what to do next. This leads to some embarrassing failures.
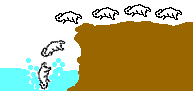
- Trust no one. Do all of your own calculations. Don't assume the persons next to you know what they are doing. Although the story that lemmings follow each other off cliffs is only a myth, the "Lemming Effect" in lab is proven fact. Misinformation can spread like wildfire through the lab when one self-confident student is used as the source, and everyone else just does what he or she did.
- When doing a titration, leave nothing to chance. Students tend to forget the basic rules of keeping errors low on a titration.
- Make sure your titrant solution is well-shaken. It takes 10 or 20 minutes of continuous shaking to get part-per-thousand uniformity when inverting a volumetric flask to mix a solution. Solutions in plastic bottles with a large head space will mix more quickly.
- Be sure your buret is clean. A walk around lab during the second or third experiment shows that most students have several tenths of a mL hanging in drops on the inside of their burets.
- Rinse your buret with the titrant before filling it for first use.
- Read all volumes to the nearest 0.01 mL. A check of notebooks turns up many students who are recording only to the nearest 0.1 mL.
- Start the buret somewhere between 0 and 1 mL. Don't try to set the buret exactly at 0.00 mL when you begin a titration. Don't forget to record that initial volume.
- Split your drops at the end point using the "microsquirt" technique. A recent spot check on procedure found students "blooping in" a few drops to get the end point color change. Remember that each full drop is 0.05 mL. You are trying for a precision of 0.01 mL.
- End points occur when the sharpest change in color is observed. Trying to match colors to previous runs is hazardous at best, since many end point colors are unstable. Unless you are color blind, don't expect someone else to tell you when the end point color has been achieved.
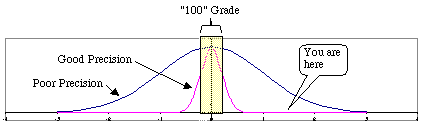
- Don't zone out when your instructor talks about "relative error." To test your understanding of relative error, take the following simple test. You have three standardization runs with values of 0.1032 M, 0.1045 M, and 0.1024 M. It looks like your mean value will be plus or minus 0.001 M. Choose one:
- (a) Things are great, since a relative error of 0.2% is good, and my error is 0.001.
- (b) Things are terrible since my relative error is about 1%. I must improve my lab techniques, then do more titrations.
If you chose (b) you pass the test. If you chose (a) you failed the test. Go look up how to compute relative error again!
- When doing a standardization, compute the molarity after each run. If the results do not have the precision you need, check your technique and correct it. Then do more runs until you have stable precision. When you run your unknown, do the same thing, only calculate the value sought instead. Remember that you probably will have been given enough unknown to make only three runs, so have your technique sharpened up before you run these. DO NOT just record your values, then wait to do calculations the night before your results are due. That is not the time to discover your titration precision is only 4% relative.
- Know the concentrations of the reagent chemicals provided in the lab. When the experiment calls for "6M HCl" don't assume that the reagent provided has magically become 6M. Because we "trust no one," we prepare most of our diluted reagents ourselves by diluting factory-fresh commercial reagents. If someone else has prepared reagent for you, check it for funny deposits or discoloration that might mean they gave you an old bottle prepared last year. If the reagent does not act as expected, report this immediately to your instructor. For example, a procedure called for "50%" sodium hydroxide. The storeroom prepared this by adding 50 g of sodium hydroxide pellets to 100 mL of water. When 0.1M NaOH was prepared from this, the concentrations were all low. (Think about it. 50 g/(50 g + 100 g) gives you 33%, not 50%. Oops.)
- Keep an eye on your colleagues in lab, they may be contaminating the reagents you rely on. Make sure they never stick anything into those commercial reagent bottles. If you need only a few drops, pour a little out into a small beaker, then use a dropper to measure out what you need. If you need only a small quantity of a solid reagent, shake out a small amount into a beaker or onto a watch glass, then take what is needed. Dispose of the small remaining quantity using proper disposal procedures. Make sure they put the caps back on and screw them on firmly.
- Leave nothing to chance. If it's your unknown going into an oven, watch out for the following.
- Check the oven temperature yourself, don't assume "the staff" has kept it at 110°C.
- Check the oven for wet glassware that will raise the humidity and keep your sample from drying. Some people still think they have to dry their glassware, even though the next step will be to add water to it.
- Use a graphite pencil to place a clear label on each item to make sure someone else won't pick it up.
- When you bring small quantities of chemicals to your work area, be sure you label each container. Don't trust yourself to remember which beaker is which. Failure to do this has led to some really strange chemistry. The student swore that the reagents in the unlabeled beakers where those needed. A few simple qualitative tests proved otherwise. The student was completely astonished that this could have happened.
- Don't ask the person next to you how much of anything to measure out. What makes you think they know what they are doing?
- Calculate how much standard is required for a 30 mL titration. Calculate how much unknown is required for a 30 mL titration. DO NOT assume that the suggestion made in your textbook is correct. On a recent experiment students were told to try a trial titration of 0.1 g of unknown first, then compute how much unknown to use on all subsequent titrations to get 30 mL. A spot check showed that many students decided to just use the grams suggested by the book for the standardization when weighing out their unknowns. They persisted in this even though their titrations were coming out at 11.34 mL, for example. The relative error on 10 mL, assuming total measurement errors of about 0.05 mL, would be 0.5%. "Class A" work is 0.2%. A 30 mL titration would have put the relative error down to 0.17%.
- Keep all standard and unknown bags until after you have been graded on an experiment. The plea that "you must have mixed up my unknown with someone else's" will not earn you any sympathy unless you can prove it.
- When asked why a student was so far behind in a spectroscopy experiment, the reply was "I had to remake my unknown and standard three times. It takes a whole period just to re-dissolve the unknown." The experiment directions called for making "stock solutions" of unknown and of standard, then changing the dilutions of these to make working curves or unknown measurements. Making new concentrations by dilution is a very rapid process; dissolving an unknown with acid is usually quite slow.
Remember that volumetric flasks are necessary when you MAKE a standard solution or when you MAKE a solution of your unknown, but STORAGE of these solutions is often better done in a polyethelene bottle. Not only is the plastic bottle cheaper and tougher, polyethylene adsorbs fewer ions than does glass. Time is often lost when students throw away a solution they should have kept, just so they can re-use their volumetric flask for a new solution. Remember to clean the polyethylene bottle carefully, then rinse it with a small portion of your solution before transferring the remaining contents of the volumetric flask.
If you discover other cases where trusting others or leaving something to chance has messed up your experiment, send me an e-mail at david_zellmer@csufresno.edu. Your name will NOT be used in any references to the content of your message!
This page was last updated on 21 February 2001.
|