
The images below were originally part of a HyperCard stack used to introduce the basic ideas and methods for doing proper mass measurements. These are posted on the door to our balance room.
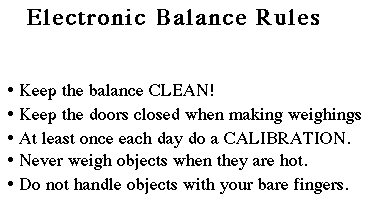
| The modern electronic balance is a deceptively simple device. To use it well and get good results, we must understand how it works, and what precautions we must take when handling samples to get the precision we need for good laboratory practice. |
|
| Laboratories fight a constant battle against a seeming force of nature that trashes analytical balances. Chemicals spilled into the balance enclosure leads to unsightly corrosion, and finally corrosion of the inside of the balance and failure of its electronics. |
 |
|
When you press Tare, the balance readout is simply set to zero. When you use Calibrate, a known mass is internally placed on the balance, and the electronics are recalibrated to provide the exact magnetic current to the electromagnet to balance the mass as displayed. |
 |
|
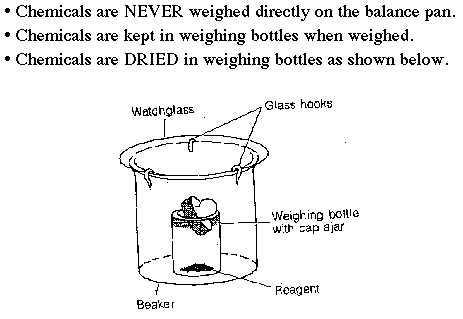
Proper use of weighing bottles would prevent all spillage inside the balances. Because chemicals would be in a closed container, there would be no problems with moisture pickup and changes in mass during weighing. Far too many students still use weighing paper inside of these balances which causes mess and inaccuracies.
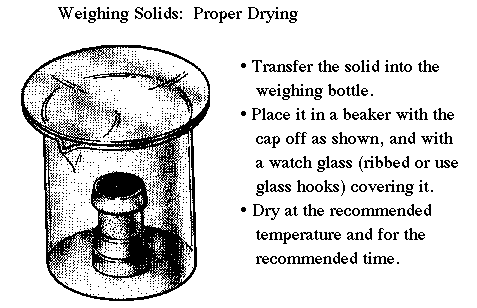
Another common error is placing heavy beakers and flasks inside the balance and then attempting to weigh chemicals into them. Remember that electronic balances of this type can only weigh a maximum allowed mass of about 100 grams. The beaker shown in the diagram is for protection while the weighing bottle is in the drying oven. Students who put "bare" weighing bottles into the ovens usually have them tipped over and spilled. Also remember to remove the cap from the weighing bottle -- the moisture can't get out if the container is sealed. |
 |
|
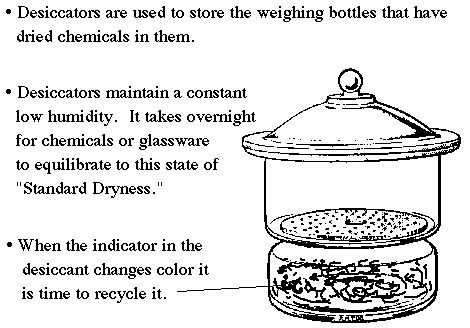
Desiccators are designed to provide an environment of standard dryness. This is maintained by the desiccant found inside. A color indicator turns pink when it is exhausted. Don't leave the lid off for prolonged periods or the desiccant will soon be exhausted.
A common error is to leave the lid of a freshly dried weighing bottle on when it is first placed into the desiccator. The moisture in the desiccator must be allowed to equilibrate with the solid in the weighing bottle. This will take several hours, and is best done by leaving the weighing bottle top off until the next lab period. |
 |
|
The sintered glass crucible is used to filter the silver chloride precipitate (or other solid) from its parent liquid. Before this crucible can be used for filtering it must be cleaned, then dried to constant weight.
The filtering apparatus shown uses a vacuum to aid filtration. A trap is a very good idea to keep liquid from getting into the vacuum system. |
 |
|
The following series of diagrams shows the steps needed to properly dry and weigh a solid placed into this weighing bottle.
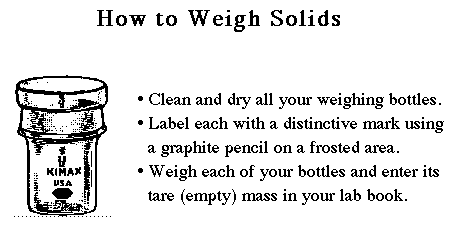
It is always a good idea to have a table of the empty masses of all the weighing bottles in the student inventory. These tare weights can be used to determine the total solid in the weighing bottle. |
 |
| Remember to keep the watch glass on and the weighing bottle top off while drying in the oven. |
 |
| Allow the weighing bottle (top off) to equilibrate overnight in the desiccator. The following period, place the top back on the weighing bottle and keep it this way while storing in the desiccator. |
 |
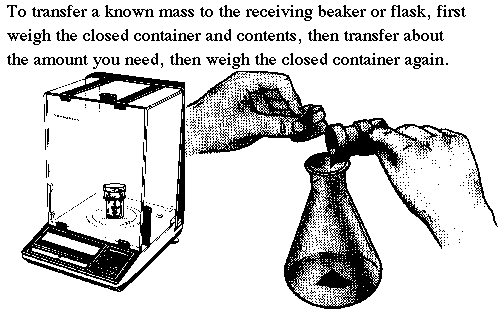
| Weigh the required amount of solid by difference. To do this first determine the amount of solid you wish to weigh. This is called the TARGET value. Your task is to hit this target value within about 10%, then record the mass to the nearest 0.0001 g. With practice you can learn to "tap" the solid from your weighing bottle into the flask or beaker outside the balance. Start by tapping less than the amount you will need. Re-weigh the weighing bottle and calculate the mass transferred by subtracting the previous mass. Estimate how much more solid you will need to add to reach the target value. Tap in a bit less than that amount, and calculate the new mass transferred. If necessary, do a third tap. With practice you can hit your value (plus or minus 10%) in three tries. Don't waste time trying to hit your target value exactly. |
 |
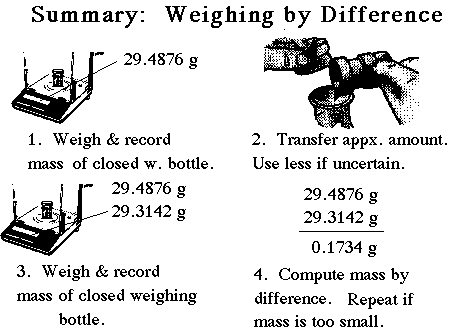
| Remember to record all data directly into your laboratory notebook. Record all masses to the precision limit of the balance. In this case to the nearest 0.0001 g. Record the initial and final masses of the weighing bottle in the laboratory notebook. Then subtract the two to get the mass weighed out. |
 |
| When a solution of known concentration is to be prepared, the student must first determine how much solid is required. This is known as the TARGET value. A common student error is to spend an hour in the balance room trying to hit this target value exactly, usually by using a spatula to move crystals of the solid back and forth between the weighing bottle and the beaker. This is a big waste of time. If the target value is calculated to be 0.6543 g, the student need only hit this value within 10% or so, so any mass between about 0.6 and 0.7 grams would be fine. Just record the mass to the nearest 0.0001 gram. (Yes, 0.7034 gram would be OK too.) |
 |
|
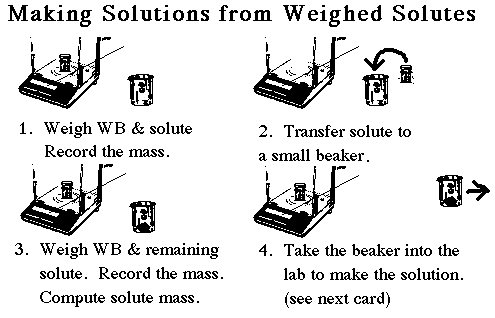
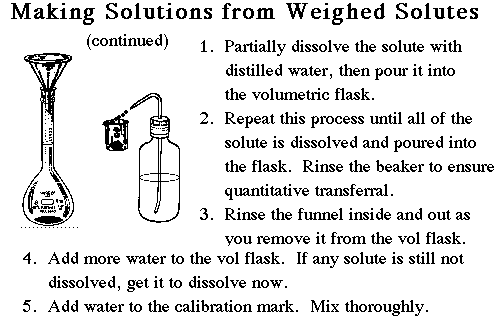
Remember that the weighing bottle belongs in the balance, and a small beaker to receive the solid is kept outside the balance. Once we are within 10% of the target value it is time to write the final mass down and transfer the contents of the beaker into the volumetric flask.
The transfer must be quantitative so use a funnel to prevent missing the small opening of the flask. Use a wash bottle to wash all solid into the flask. Then rinse down the beaker, the funnel, and the inside neck of the volumetric flask. Add enough water to the flask to dissolve the solid. After dissolution, add water to just below the calibration line. A dropper should be used to make the final adjustments to the calibration mark itself. Now shake the flask for 10 or 20 minutes to ensure that the solution is completely uniform. |
 |